Monday, 11 May 2015

How I made a simple reversible child's skirt


      I’ve made a couple of children’s skirts now and thought it was time to try something new, which is where the idea for a reversible skirt came in. A friend of mine has an adorable little girl who is one part sugar plum fairy and one part rocker on a motorbike, so I thought a reversible skirt might be the perfect way to bridge both sides of her personality. I found the rocker fabric first at Abakhan, this great green, red, black and white skull print with roses: it was ideal.
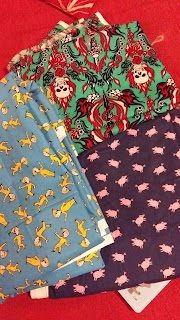
Bought by weight, a selection of printed cotton

     To contrast this I wanted something super girly so I looked online and found a great pink butterfly print on eBay, bold enough to contrast against the strong design of the rocker fabric. Both were a medium weight cotton so very easy to cut and work with.
The butterfly side
     The process was very similar to how I had made my previous skirts so it was simply a case of adjusting my method slightly.

  • I measured the child’s waist size and the distance from waist to knee, adding a good few extra inches to the waist size (to avoid an uncomfortable pencil skirt effect) and a couple of inches to the length from waist to knee to allow for the hem and the elastic channel. 
  • Next I cut rectangles of the fabrics according to these measurements, making sure I’d left plenty of allowance for seams, elastic channel at the waist, and finishing etc. 
  • First on the list for sewing was the side seams, folding each piece of fabric right side to right side and sewing straight down the side edge (each separately, the fabrics were not attached at this point). 
  • Second I put the loops of fabric right side to right side and stitched along the top on the wrong sides (making sure the patterns were the right way up), before turning the fabric the right way round and running a top stitch around the edge. 
  • Now, I had to make a channel for the elastic to go in so I made sure the fabric was as flat and even as possible and ran a top stitch over the right side of the fabric, about two inches down and parallel to the top edge. This left a gap wide enough between the top of the skirt and the second row of stitching for the elastic and also (very importantly) I left a gap of about two inches to actually thread the elastic through from the inside. 
  • Cutting the elastic to the right size determined how comfortable it was so I measured the elastic on a relaxed tummy and added a bit extra, as well as an extra couple of inches for sewing the elastic together. 
  • To make it easier to work the elastic through the channel I secured the loose end of the elastic to the entrance of the channel with a safety pin and clipped another safety pin to the end of the elastic I was threading through, it gave me something solid to hold while working it round inside the fabric. I used 1inch wide general purpose elastic. 
  • Once the elastic was through I secured the ends together with a stitched square and cross over the two loose edges to make a strong loop. To close the channel I stitched a neat line of top stitch along the gap to conceal the elastic completely, the skirt was now finished minus the hem. 
  • To complete the hem I simply folded up the bottom edges and tacked them right side to right side, leaving a gap to pull the skirt back through after, as it makes the skirt turn inside out. I simply then stitched along my tack lines (removing my tacks afterwards) before turning the skirt the right way round and then top stitching along the bottom edge to help the fabric look neat and flat at the bottom, as well as the close the gap where I’d pulled the fabric back through.
    The great fabric contrast

    The funky rocker/biker side

     So there you have it! This very simple skirt is fantastic, giving flashes of another funky fabric underneath once worn, and the double layer of fabric also gives the garment the strength needed to sustain the energy of a toddler. I will definitely be doing this pattern again because it effectively means I can make two skirts in one short amount of time – what’s not to love! This also means it’s great for summer holidays when versatile clothing means fewer items in your suitcase.

All blog content and photos are Copyright of Charisse Sayers Proofreader & Copywriter www.charisse-sayers.com I welcome all feedback and would love to know your thoughts so please get in touch, comment, share, like and generally get involved – you can also find me on Twitter, Facebook and Instagram!

Thursday, 7 May 2015

My review of the new Back to the Future themed Café 80s in Hanley, Stoke-on-Trent


     It wouldn’t take a genius to notice a soft spot for the 1980s running through my blogs, from name dropping Molly Ringwald to coveting the wardrobe of Christine Cagney. In particular I am a sucker for a fabulous 1980s film, full of big hair and blue eyeshadow, the world pre-hair straighteners looks like a more fun, expressive place, especially in American movies (Gregory’s Girl is fun but not quite as glamorous as Overboard for example). And as every 80s film fan knows there is one trilogy that has stolen the hearts of a generation – Back to the Future.
Is two boxsets enough?

     There’s a running joke in my house if we haven’t watched them for a few weeks, the films are nearly always on ITV2 so we’ll quite often flick through and find them by accident, and happily rewatch with as much enthusiasm as if it’s the first time we’ve seen a flying DeLorean or neon trim steam train. The second film is my favourite, as a child I loved imagining what the future would be like, and even now I’m waiting for my Black & Decker hydrator to arrive so I can make giant Pizza Hut branded meals at the touch of a button.
     So it was with a touch of mild hysteria that I spotted a news article on Twitter saying that a Back to the Future themed café had opened in Hanley, Stoke-on-Trent. The new Café 80s was also extra exciting as it recreated a part of my favourite film, the ‘retro’ Cafe where Marty McFly senior defeats Griff on behalf of his weedy, unconscious son. Normally trendy replica restaurants are kept for London’s elite hipsters, but here was a BTTF themed restaurant opened only a short drive away from my house – I had to go.
     Luckily my other half is just as obsessed with BTTF as I am so it was a no brainer to go ASAP and we agreed on the following Saturday, donning our finest 80s tribute BTTF and Teenwolf t-shirts. Which is how we came to be battling down the rainy and ridiculously windy streets of Stoke-on-Trent last Saturday morning, looking out for the Café 80s – and it wasn’t hard to spot. The location was a stroke of genius for a start, right on the corner it mimics the Café 80s from the second film perfectly, even with the doors in the right position, there was also a Pepsi Perfect sign hanging in the window so we knew we hadn’t got lost.
     Once inside we were pleased to find plenty of seating and tables, which had been a worry of mine – all style and no practical substance, but this clearly wasn’t the case. Starving hungry we ordered a grilled cheese sandwich each and a cappuccino before wandering around and enjoying taking in all the little details that make the Café 80s something special. There are two exercise bikes in the corner, ensuring my partner kept barking “Keep peddling you two!” into my face in the style of Griff. There are working arcade machines, a checkerboard floor, a Hoverboard, and a fax machine declaring ‘YOU’RE FIRED’ just like when Marty gets stung by Needles (the creep).
What a way to lose your job, on the toilet
"Keep peddling you two!"

The American diner furniture throughout

     We loved wandering round taking photos and soaking in the nostalgia. As expected there was 80s music in full flow courtesy of two flatscreen TVs showing old music videos. I think part of the charm was that this obviously wasn’t created by a company wanting to exploit that this year is 2015, the year the second film is set. It’s clear lots of the equipment is second hand – charity shops and eBay must have been lovingly trawled for props – and the effort pays off. It feels like a loving tribute to a fantastic trilogy, not a soulless recreation: it’s got heart.
The head of MJ in the distance
The magic newspapers that 'erase' as time is rewritten
     When the food arrived it was plain the menu had been devised with an American diner in mind. We could have had burgers, hot dogs or an ice cream sundae but for breakfast we were pleased with a grilled cheese sandwich. Like a toastie but cooked on the griddle the sandwich was a little greasy but very tasty and one was definitely enough [N.B. I've since been informed the griddle was broken that day and our sandwiches were done in a frying pan, hence they weren't as crisp as normal]. It also came with a little dish of tomato soup to dip, which definitely helped to cut through what could have been a slightly too rich meal. The coffee was instant but very welcome and served in an 80s themed mug, not a tiny cup. All in all we were very happy with our breakfast, it definitely seemed like a ‘greasy spoon’ meal rather than an artisan café but I assure you there is nothing wrong with that, good food cooked simply and charged fairly is always alright by me! The food was clearly prepared from scratch and cooked on the premises, which is more than many ‘upmarket’ chain cafés can say.
The burgers look epic

The cafe also sells booze!

     It was with slight reluctance that we left this charming themed café to continue our shopping trip in Hanley (i.e. go to Primark and Abakhan). We will definitely be back again…in fact, we already have! Battling back to our car once we’d finished shopping we nipped in later in the afternoon for a pot of tea and bowl of chips. As before the chips were fresh from the fryer, cooked to order, and our tea came with plastic spoons and served in one of those big metal teapots that will burn you if you open the lid incorrectly – no pretention, just good, honest food.
It's the details that make the place seem authentic

The theme extends to the toilet facilities!

     So if you’re a fan of Back to the Future this should be an essential place for you to visit, but even if you’re not it’s worth taking a detour from the main shopping centre to enjoy a cuppa and a bite to eat somewhere that’s not a chain café. There's ample seating, good access for those with limited mobility or a pushchair, and accessible toilet facilities. So go on, treat yourself to a meal with a bit more style – you won’t regret it. 
 
All blog content and photos are Copyright of Charisse Sayers Proofreader & Copywriter www.charisse-sayers.com I welcome all feedback and would love to know your thoughts so please get in touch, comment, share, like and generally get involved – you can also find me on Twitter, Facebook and Instagram!

Friday, 1 May 2015

How I refreshed an old pair of toddler shoes with fabric paint and glue on gems


      Children get through shoes at a ridiculous rate, and often are out of a pair before they’ve even scuffed them. As such hand-me-down and second hand shoes are always readily available and I’m always being passed spare pairs for my little one. One such pair was this pair of sturdy, but slightly faded, Start-Rite shoes. They’ve hardly been worn but must have been stored in the sunshine as the blue was nowhere near as vibrant as it should have been, so I decided to have a little fun revamping them.
The shoes prior to starting

      First I found some cheap fabric paint and brushes from Hobbycraft and using the blue and black paint got some pigment back into the leather. Now I won’t pretend that I have high hopes of the paint being entirely colourfast or fade resistant but these shoes were just going to be for fun not everyday wear so it wasn’t a concern.
The leather freshly painted
      Next I used the same glue, gems and tweezer technique I perfected on both my wedding shoes and the awesome Missy Elliott inspired Adidas trainers I’d blinged up. I used a bigger range of colours on these shoes, as the brighter hues contrasted nicely with the dark blue and black painted leather.
The lilac, pink and red gems glued on
Gems and tweezers

Glue

       I was really happy with the finished result, it gave a new lease of life to a slightly tired looking – but still fully functional – pair of good quality shoes.
Super cute and practical
Minimal gems compared to the Missy trainers

All blog content and photos are Copyright of Charisse Sayers Proofreader & Copywriter www.charisse-sayers.com I welcome all feedback and would love to know your thoughts so please get in touch, comment, share, like and generally get involved – you can also find me on Twitter, Facebook and Instagram!

Another basic child's skirt - this time in a difficult (but fabulous) floaty bird print fabric


     I love this bird print fabric, it’s floaty and the vibrant birds and foliage just scream of a sunny beach holiday, however it can be a little tricky to sew with. I ordered it to make myself a tunic dress for summer and I was left with almost a whole metre spare once that was complete so when my niece asked for a matching skirt I could happily oblige.
I love the contrast of the cream and the bright birds

      Children don’t want to be restricted so simple elasticated waistbands are an easy and comfortable option, also allowing for the skirts to grow as the little ones do. This skirt needed to fit a tall six year old so it was bigger than the previous skirt I’d made but I followed the same basic method, albeit making allowances for the slippery fabric.

  • I measured the child’s waist size and the distance from waist to knee, adding a good few extra inches to the waist size (to avoid an uncomfortable pencil skirt effect) and a couple of inches to the length from waist to knee to allow for the hem and the elastic channel. 
  • Next I cut a rectangle of the fabric according to these measurements, making sure I’d left plenty of allowance for seams, elastic channel at the waist, and finishing etc. 
  • First on the list for sewing was the side seam, folding the fabric right side to right side. 
  • Second I folded over the top edge of the fabric and ironed it, leaving a good allowance for making the channel for the elastic to go in, before running a top stitch around the edge. 
    Sewing along the folded top edge
  • Now, on the inside I had to make a channel for the elastic to go in so I folded up the rough edge of the fabric I’d just stitched down and then ran a top stitch along it, leaving a gap wide enough between the two rows of stitching for the elastic and also (very importantly) leaving a gap of about two inches to actually thread the elastic through! 
    The elastic channel ready to go
  • Cutting the elastic to the right size determined how comfortable it was so I measured the elastic on a relaxed tummy and adding a bit extra, as well as an extra couple of inches for sewing the elastic together.
  • To make it easier to work the elastic through the channel I secured the loose end of the elastic to the entrance of the channel with a safety pin and clipped another safety pin to the end of the elastic I was threading through, it gave me something solid to hold while working it round inside the fabric. I used 1inch wide general purpose elastic. 
  • Once the elastic was through I secured the ends together with a stitched square and cross over the two loose edges to make a strong loop. To close the channel I folded up the open edge and stitched a neat line of top stitch, the skirt was now finished minus the hem. 
    Securing the elastic
  • To complete the hem I simply folded up the edge and then folded in the raw edge and ran a straight stitch round it so it was neat from both the inside and the outside.
    The finished skirt

      There you have it, basically the same process as before but a bigger size and different thread tension due to the lightweight fabric. Mastering this basic design means that I can always make matching mini me skirts for my nieces…whether they want me to or not!

All blog content and photos are Copyright of Charisse Sayers Proofreader & Copywriter www.charisse-sayers.com I welcome all feedback and would love to know your thoughts so please get in touch, comment, share, like and generally get involved – you can also find me on Twitter, Facebook and Instagram!

Followers